Introduction to Mixing and Mastering
Mixing and mastering are critical stages in music production that involve shaping and refining the sonic elements of a track. Through various techniques, the engineer balances levels, enhances the stereo image, adds depth and dimension, and ensures the final mix is ready for distribution. In this extensive content, we will explore the essential techniques used in mixing and mastering, including balancing levels, panning, stereo imaging, equalization, compression, and more.
But before we start mixing and mastering, let us do a short recap of the beat/instrumental we have made so far:
So we started off with some bass notes:

And here is how the bass notes sound:
So from the bass notes, we play the same notes as the bass notes in two octaves up from the bass notes as in the picture below:
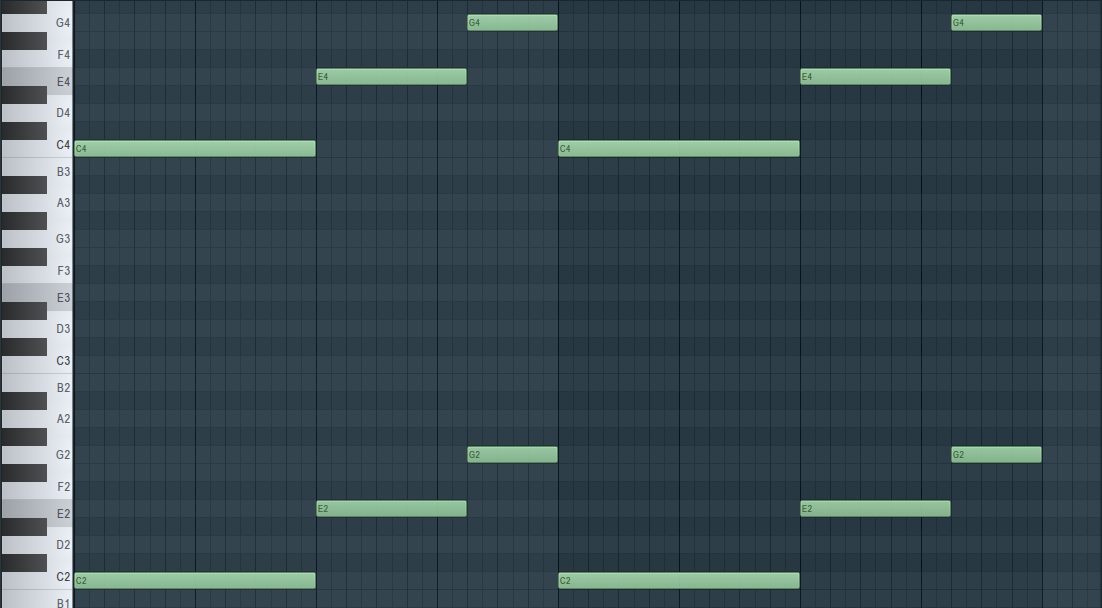
Now the bass notes coupled together with the other notes two octaves above would typically sound like below:
We added a simple triad chord:
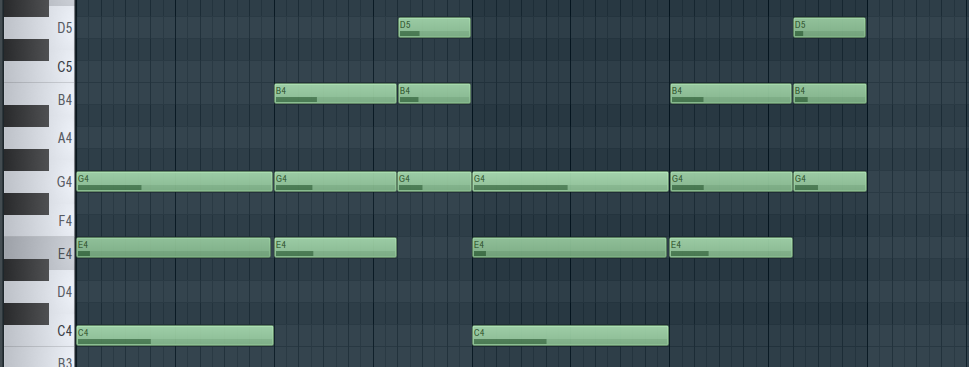
Now the triad would typically sound like below:
After that we had triad chord layered with bass notes from a lower octave:
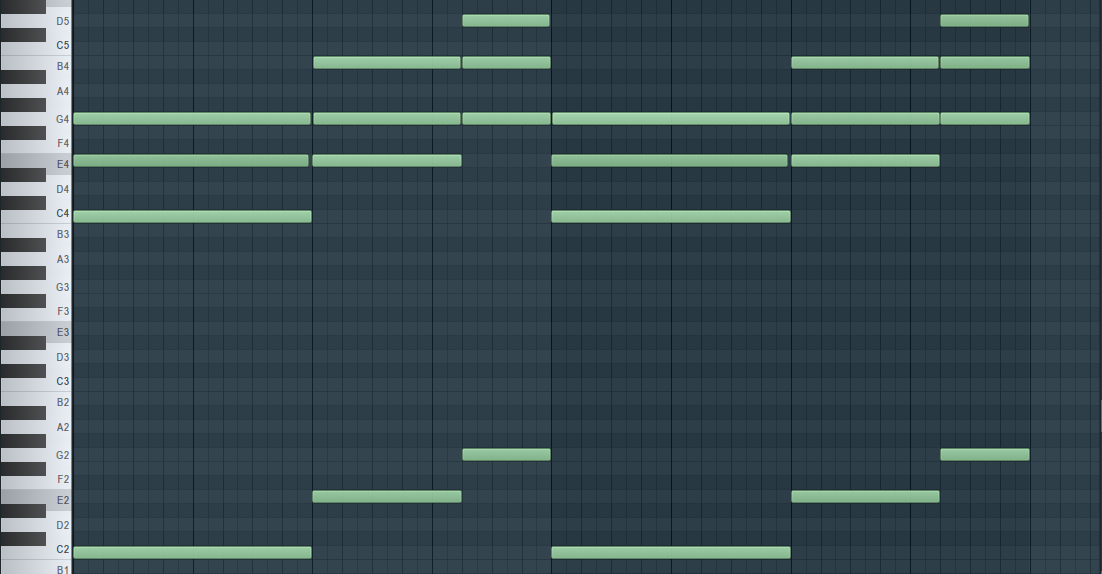
Now the bass notes coupled together with the triads would typically sound like below:
We then inverted the note E of the triad chord an octave up:

Now the triad chords would typically sound like below:
We then added the notes B in the first chord and D in the second chord:

Now the triad chords with E note inverted an octave up and we added the notes B in the first chord and D in the second chord:
We then add the notes G in the first chord of the first part and F# in the second chord of the first part, and we do the same for the chords in the second part and also with an addition of the notes B and A at the end.
We also play the chords in different velocities and also the notes are not exactly played at the same time but usually have a humanized offset and small imperfections to give the chords and melodies a human touch🎶.
We then get the complete chord progression:
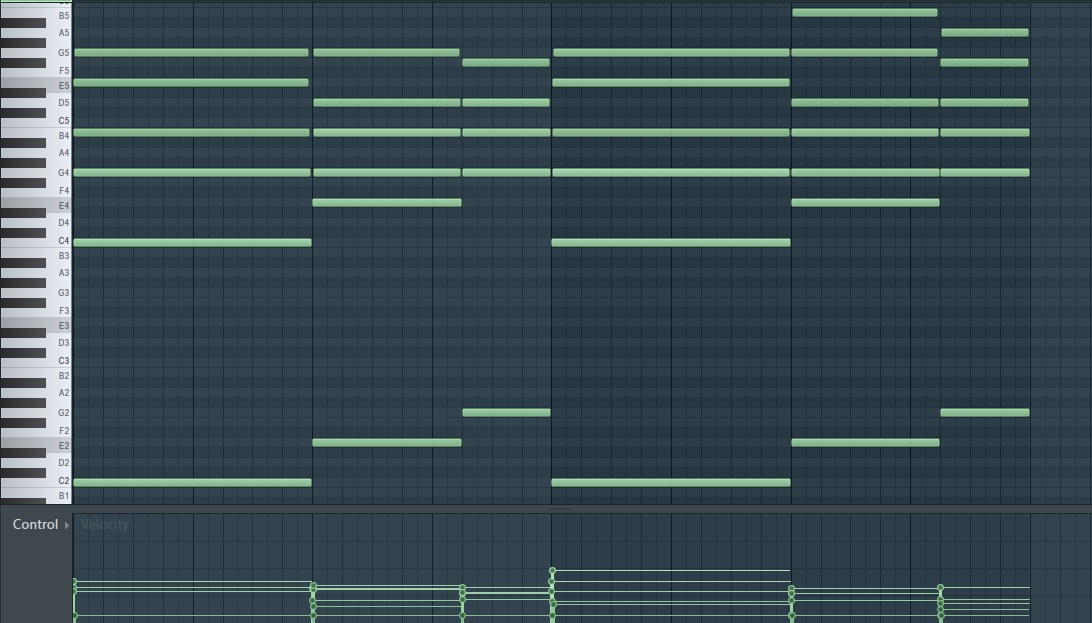
This is how the chord progression sounds:
For example we add a synth pad layer which adds a smooth high end texture and its chords would look like:

And synth pad layer would sound like:
We then add this synth layer playing this progression which provides a smooth low end texture.

And synth layer would sound like:
We add these synth chords in which the notes are phrased in staccato. These provide a good texture in the mid frequencies.
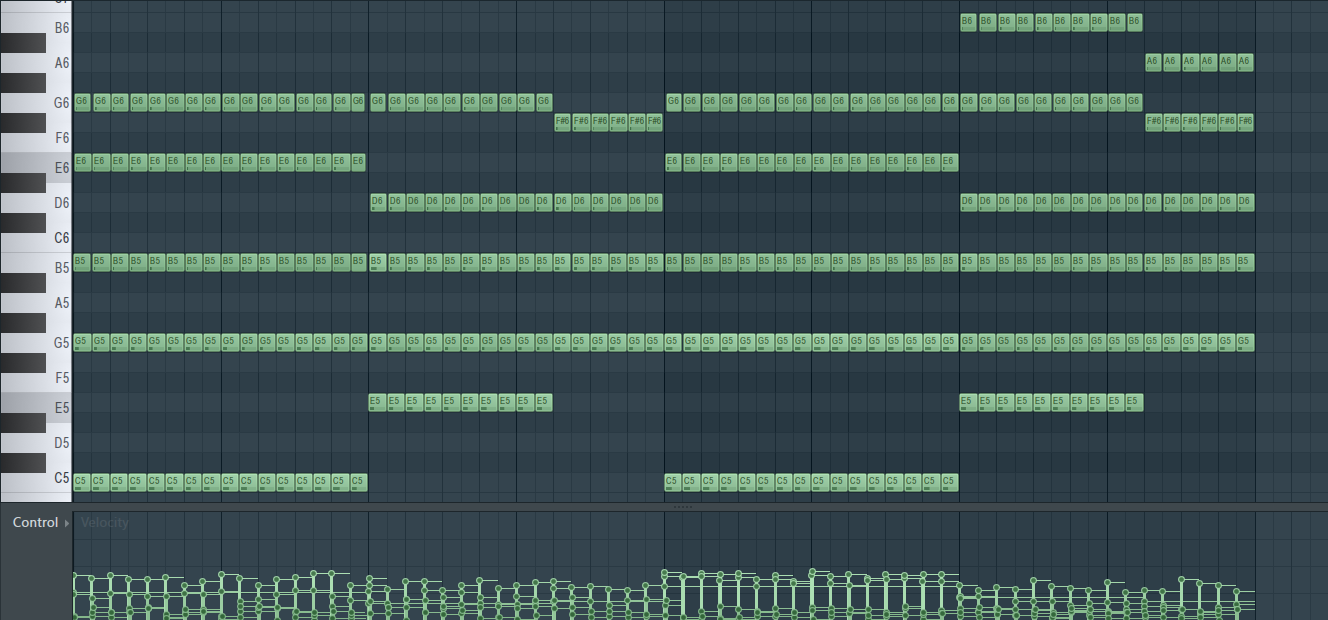
Staccato: This means "detached" in Italian. Here, the notes are played with clear spaces between them.
We add this synth layer that adds a smooth high-frequency and colored texture:

And this synth layer would sound like:
With the chords all set, we then come up with a simple catchy guitar melody:
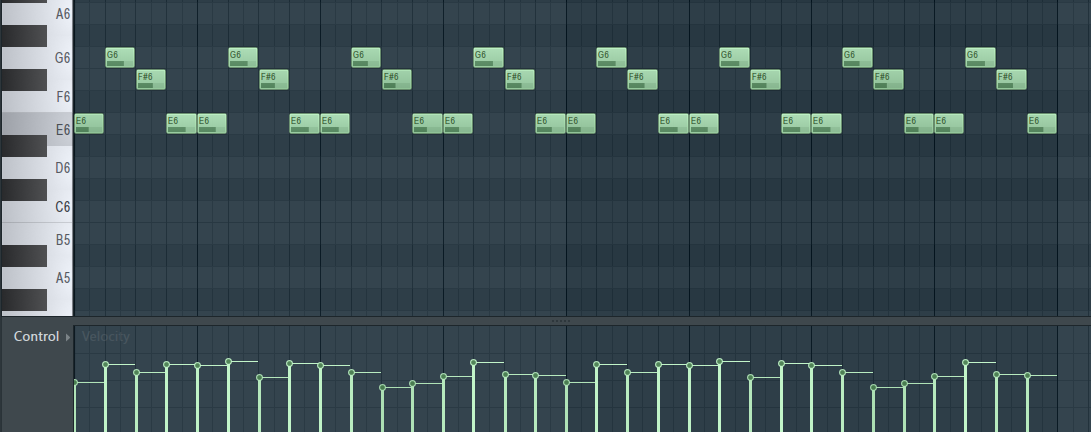
The melody in the image would sound similar to this when played on a guitar:
We then start to arrange the melodies in a sequence building from a loop to a full song instrumental. So we have this so far:
We then add a baseline occupying mono frequencies playing the following notes:
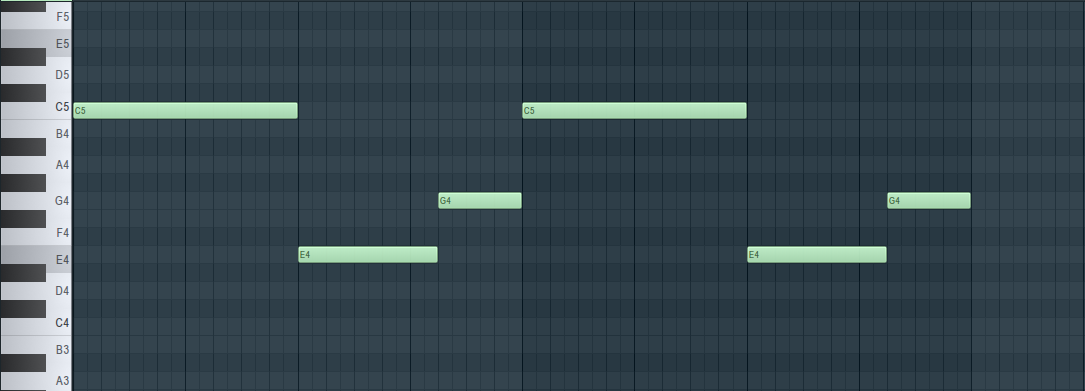
The bassline would sound like:
We layer the bassline with a more lower bass that is more richer in the sub frequencies and has a more wider stereo field:

The bassline layer would sound like:
When the two basslines are layered and played together, we achieve a more fuller bass sound that will sound even better with processing which we will discuss in-depth later on in this article.
So the basslines play the hook sections of the instrumental. However, we add this 808 bass pattern that plays in the verse sections. These 808 patterns follow the root notes of the chord progression.

The 808 bass layer would sound like:
While still on the verses, we switch up the 808 bass sample to another sample. We also alter the rhythm slightly to add a little bounce and complexity to the low end.

The 808 bass pattern would sound like:
We arrange the 808 patterns and the melodies in a sequence to make a complete song instrumental:
We then add this closed hi-hat groove:

And this hi-hat groove would sound like:
We also add this second hi-hat groove playing a two step pattern:
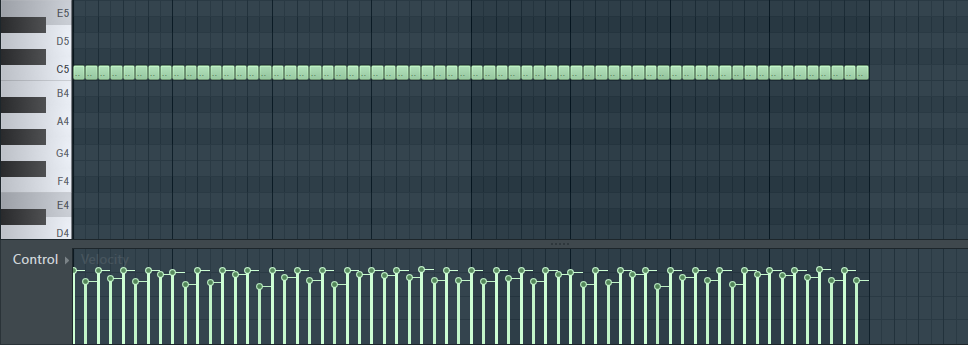
And the second hi-hat groove playing a two step pattern would sound like:
We then add a snare rim sound playing the following pattern:

And the snare rim would sound like:
We then layer the snare rim with another snare playing the same pattern:

And the snare rim would sound like:
Now these two snares sound like this when layered:
We then add this percussion:

And this percussion groove would sound like:
We then add the kick drum with this groove:

And this kick groove would sound like:
We then add a crash cymbal:
And the crash cymbal would sound like:
We arrange the drums in a sequence to make a complete song instrumental:
We then add creative sounds and fills to add extra spice.
For example, we start by adding a ride cymbal pattern:
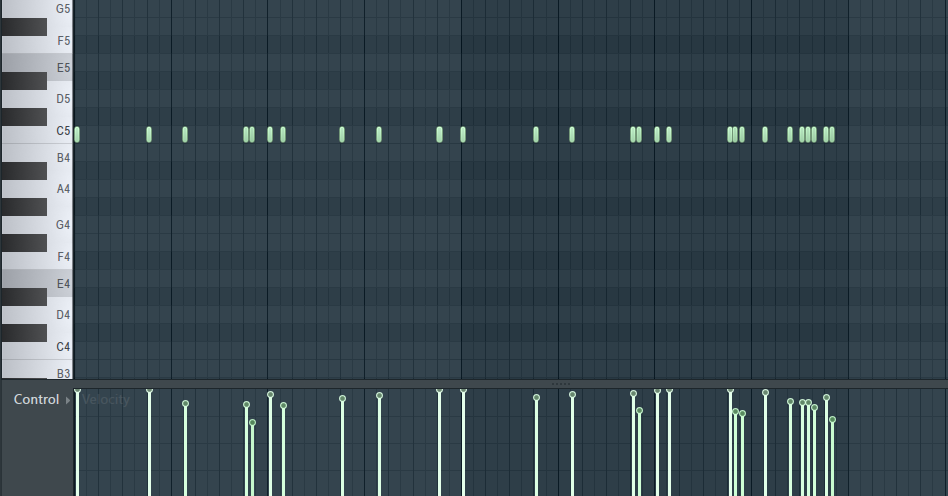
And the ride cymbal pattern would sound like:
We also add this fill:
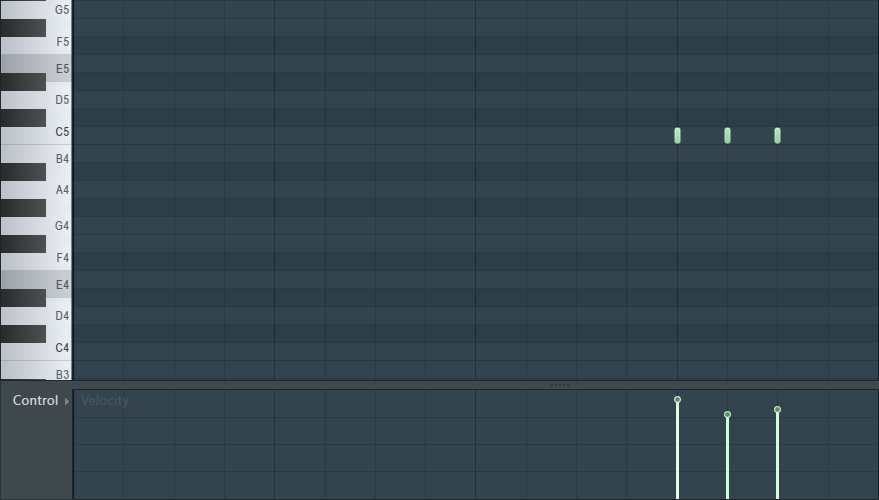
And the crash cymbal would sound like:
And when we arrange all the items we have previously covered in our recent articles, we get this instrumental audio.
The beat/instrumental is full now, but we are not yet done. The next step is the Mixing and Mastering phase. Here's why mixing and mastering are crucial for your music, summed up briefly:
Mixing
- Clarity and Balance: Ensures all instruments have their own space, avoiding muddiness and highlighting important elements.
- Professional Sound: Achieves industry-standard sonic quality, making your music competitive and engaging for listeners.
- Emotional Impact: Controls dynamics and effects to evoke desired emotions and guide the listener's journey.
Mastering
- Consistency across platforms: Prepares your music for various playback systems, ensuring consistent sound quality.
- Loudness without sacrificing quality: Optimizes loudness without distortion, making your music stand out without compromising clarity.
- Polished finish: Adds the final touches like subtle EQ and compression for a professional, polished sound.
With that said, let's delve into the fundamentals of audio engineering in the context of Mixing and Mastering an instrumental.
So, what is Audio Engineering?
Audio engineering is the process of capturing, manipulating, and producing sound in a way that enhances its quality and meets specific artistic or technical goals. It involves using various techniques and equipment to record, edit, mix, and master audio content, such as music, speech, or sound effects. Audio engineers work to achieve a desired sonic result, ensuring that the final product sounds clear, balanced, and engaging to the listener. They may work in various settings, including recording studios, live performances, or post-production for film and television.
A mixer, in the context of audio engineering, is a device or software that allows you to combine and control the levels of multiple audio signals. Its primary function is to blend different audio sources, such as microphones, instruments, or playback devices, into a cohesive and balanced mix. Here's a simple explanation of how a mixer works:
- Input Channels: A mixer typically has multiple input channels, each representing a different audio source. These can be microphones, instruments, or line-level inputs from other devices.
- Channel Strips: Each input channel has its own set of controls called a channel strip. This includes knobs or sliders for adjusting parameters like volume (fader), tone (equalization or EQ), and pan (left-right balance).
- Gain Control: The mixer allows you to adjust the gain or input level for each channel. This controls how much of the audio signal is sent into the mixer, preventing distortion and ensuring optimal signal-to-noise ratio.
- Equalization (EQ): The EQ controls on each channel strip allow you to adjust the tonal characteristics of the audio. This includes altering bass, midrange, and treble frequencies to shape the overall sound.
- Pan Control: The pan control lets you position the sound of each channel in the stereo field. This means you can determine whether a particular sound comes from the left, right, or center of the speakers.
- Auxiliary Sends: Mixers often have auxiliary (aux) sends, which allow you to send a portion of each channel's signal to external devices such as effects processors or monitor speakers.
- Bus and Main Output: The mixer combines all the individual channels into a stereo mix using buses. The main output delivers the final combined mix, which can be sent to recording devices, amplifiers, or speakers.
- Monitoring: Mixers often include headphone or monitor outputs, allowing the audio engineer to listen to the mix in real-time.
- Master Controls: These controls include the master fader (overall volume control), master EQ, and other global settings affecting the entire mix.
To start mixing, set up your workspace:
- Ensure you have a quiet environment with minimal distractions.
- Arrange your equipment, including your mixer, audio interface, speakers or headphones, and any necessary cables.
- Familiarize yourself with your equipment and software.
Organize Your Tracks:
- Label tracks clearly to avoid confusion. Use color codes if your DAW supports.
- Group similar tracks together (e.g., drums, vocals, guitars) to make the mixing process more organized.
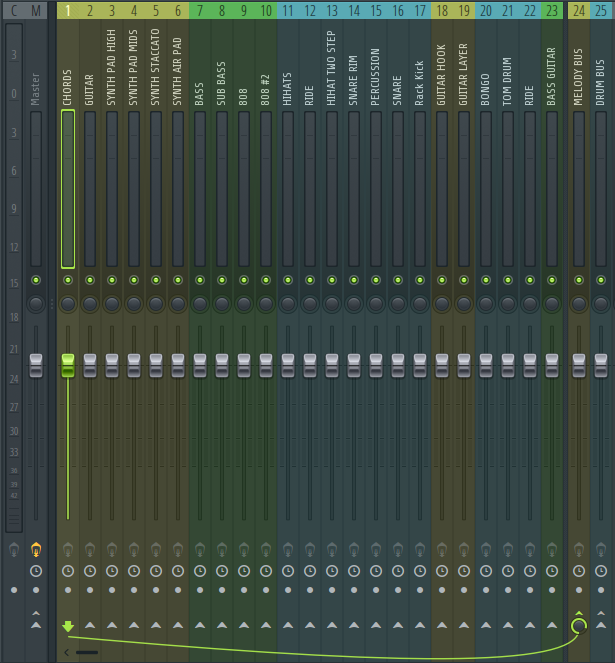
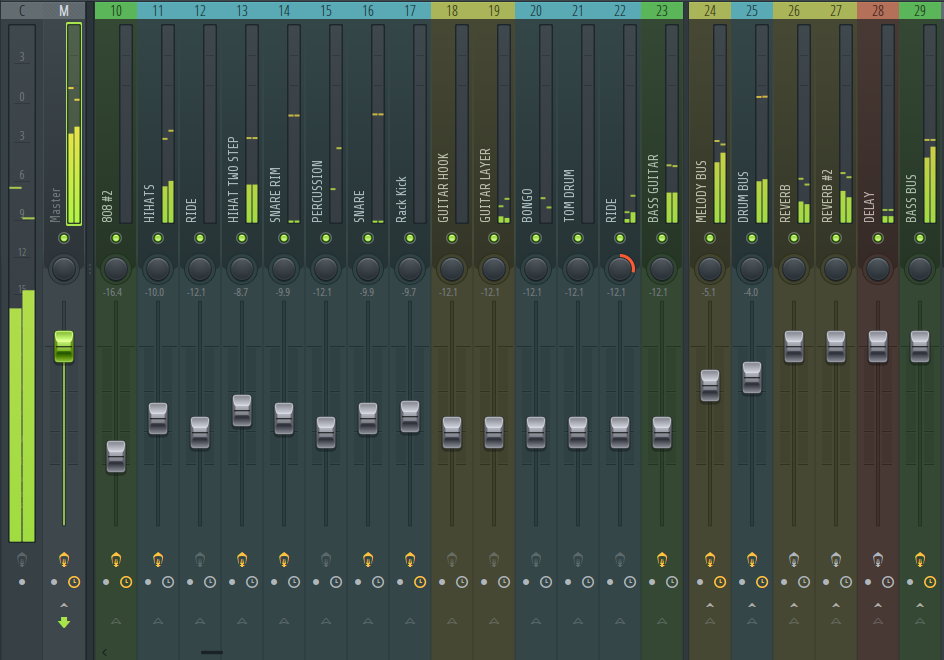
For example, we have the melody bus which includes all the melodies color coded in the same color starting from mixer track one up to mixer track 6:
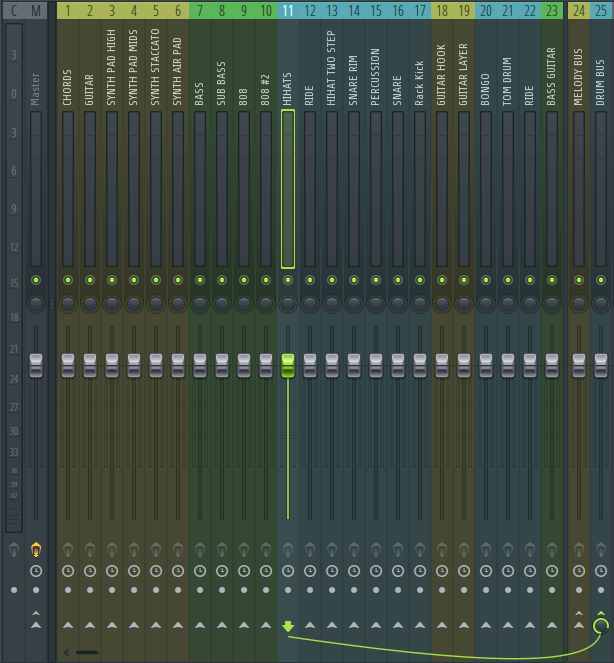
For example, we also have the drums bus color coded in the blue color:
Balancing Levels
Balancing levels is the process of adjusting the volume of individual tracks within a mix to achieve a cohesive and balanced sound. Here are some tips for balancing levels effectively:
But before we start mixing we need some headroom. What is headroom you may ask.
Headroom refers to the difference between the highest peak level of an audio signal and the maximum level that a system can handle without distortion or clipping. In simpler terms, it's the amount of space or "room" available between the loudest part of the audio signal and the maximum level before distortion occurs.
Headroom is crucial in audio engineering for several reasons:
- Prevention of Distortion: Having sufficient headroom ensures that audio signals can be processed and reproduced without distortion. When a signal exceeds the maximum level that a system can handle, it becomes clipped, resulting in unwanted distortion and harshness in the sound.
- Dynamic Range Preservation: Headroom allows for the preservation of the dynamic range of the audio signal. Dynamic range refers to the difference between the loudest and quietest parts of the signal. Adequate headroom ensures that the full dynamic range of the audio can be accurately reproduced, from subtle nuances to powerful peaks.
- Room for Processing: When mixing or mastering audio, various processing techniques such as EQ, compression, and effects are applied to shape the sound. Having headroom provides space for these processes to work effectively without introducing distortion or artifacts.
- Compatibility: Maintaining headroom ensures compatibility with different playback systems and formats. Different devices and platforms may have different maximum levels, so having extra headroom ensures that the audio will translate well across various playback environments without clipping or distortion.
- Safety Margin: Headroom serves as a safety margin to accommodate unexpected peaks or transients in the audio signal. It provides a buffer against sudden increases in volume, helping to prevent clipping and protect equipment from damage.
So to make some headroom make sure to select all tracks first:
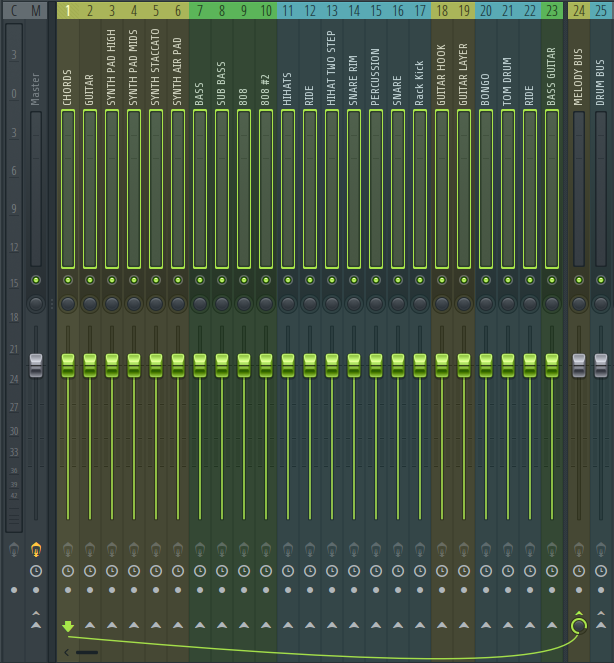
Now turn the levels for all the mixer insert tracks down to make some headroom:
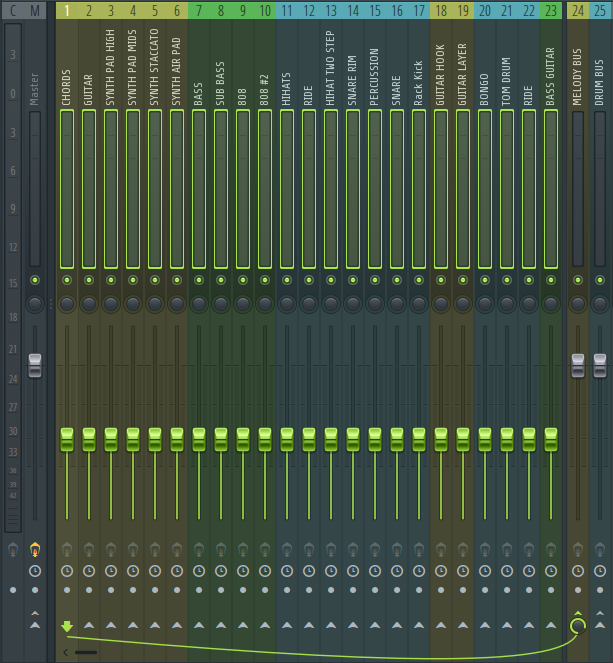
Setting levels for different music elements, such as melodies, drums, kicks, and bass, is crucial in achieving a balanced and well-mixed audio production. But before we discuss about setting the levels, lets first understand the role of the elements that make up music.
Drums: Drums provide the rhythmic backbone of the music. They include elements like kick drum (bass drum), snare drum, hi-hats, cymbals, and percussion instruments. Drums contribute to the groove, energy, and momentum of the song.
Kick: The kick drum, or bass drum, is the low-frequency percussion instrument that provides the heartbeat and foundation of the rhythm section. It's responsible for the low-end punch and impact in the mix.
Bass: The bass instruments (e.g., bass guitar, synth bass) provide the harmonic foundation of the music, filling out the low frequencies and reinforcing the harmony and rhythm of the song.
Melodies: Melodies are the main musical themes or motifs in a song. They often carry the emotional and narrative elements of the music and are typically played by instruments such as vocals, lead guitars, synths, or orchestral instruments.
Start with a solid foundation
Set the levels of your kick drum and bass instruments first, as they form the rhythmic and harmonic foundation of the mix. Then, gradually bring in other elements, such as vocals, guitars, synths, and percussion, ensuring they are well-balanced and sit appropriately in the mix.
Kick Drum: The kick drum provides the rhythmic pulse and drive of the music. Its low-frequency content, particularly the fundamental frequencies, can influence the overall energy and groove of the mix. By setting the level of the kick drum early in the mixing process, you establish a solid rhythmic foundation for the other elements to build upon.
Bass Instruments: Bass instruments, such as bass guitars or synthesizers, provide the harmonic foundation of the music. They often occupy the lower frequencies along with the kick drum, and their interaction with the kick drum can greatly influence the perceived depth and weight of the mix. By setting the levels of the bass instruments alongside the kick drum, you ensure that the rhythmic and harmonic elements work together cohesively.
Balancing Act: Once you've set the levels of the kick drum and bass instruments, you can gradually bring in other elements of the mix, such as vocals, guitars, synths, and percussion. As you introduce each new element, pay attention to how it interacts with the kick drum and bass. Aim to achieve a balanced mix where each element sits appropriately in the frequency spectrum without masking or overpowering the others.
Consider the dynamics of each element and how they interact with each other. For example, ensure that the dynamics of the drums and bass complement each other to create a tight and cohesive rhythm section. Adjust the levels to maintain a balanced dynamic range throughout the song.
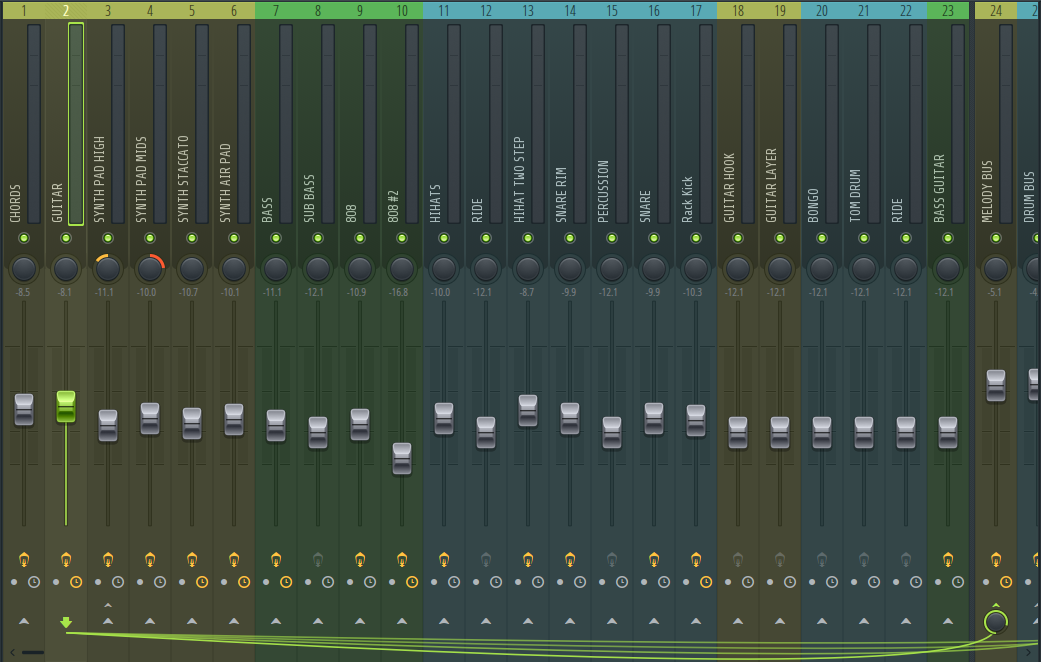
For example here we have done some mixing:
Use reference tracks
A/B referencing with commercial tracks in a similar genre can help you gauge the relative levels of different elements in your mix. Compare the tonal balance, volume, and overall energy of your mix with professionally mixed and mastered tracks. Throughout this process, it can be helpful to refer to reference tracks in a similar genre or style. Compare your mix to professionally mixed songs and pay attention to how the kick drum and bass instruments are balanced relative to the other elements. Use these references as a guide to help you achieve a balanced and cohesive mix.
Continuously listen to your mix critically, both in solo and in the context of the entire arrangement. Pay attention to how each element contributes to the overall sound and adjust the levels as needed to achieve a balanced and cohesive mix.
Solo sparingly
Soloing individual tracks allows you to focus on the details of each instrument or vocal part, making it easier to identify and address specific problems such as noise, resonance, or EQ issues. However, music is meant to be experienced as a whole, and the way individual elements interact with each other in the context of the entire arrangement can significantly affect the overall sound and feel of the mix.
So to solo a track, mute the rest of the tracks and listen to the individual track
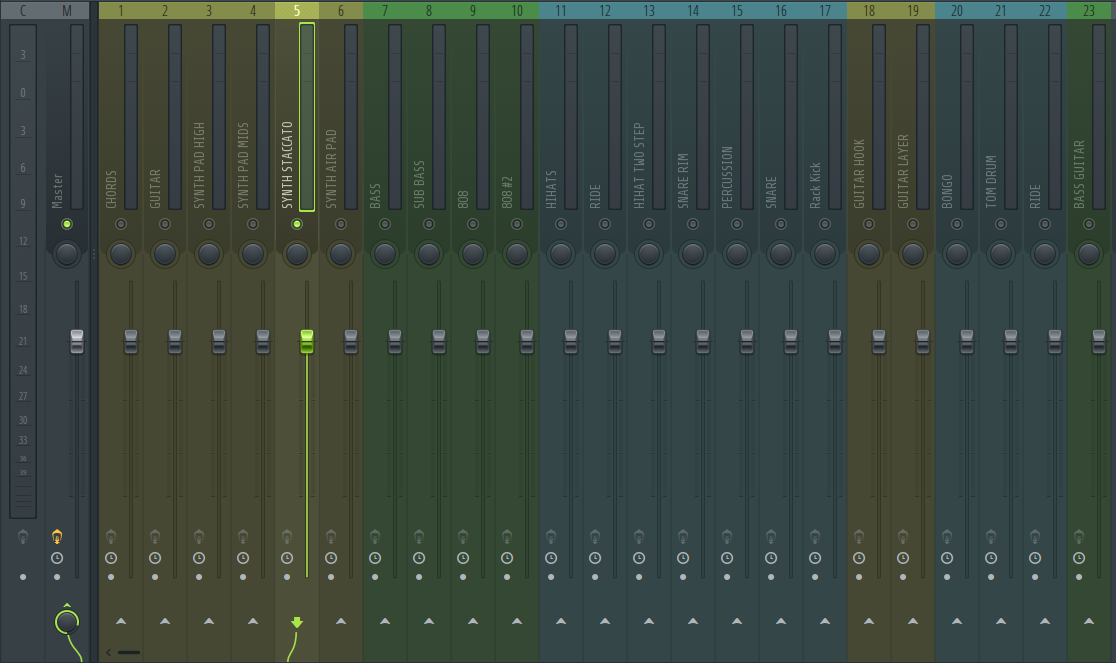
Listening to the mix in context helps you ensure that all the elements work together cohesively and contribute effectively to the overall balance of the song. It allows you to assess how each track fits within the arrangement and make adjustments to levels, panning, EQ, and dynamics to achieve a balanced and coherent mix.
While it's useful to solo individual tracks to address specific issues, make sure to regularly listen to your mix in the context of the entire arrangement. The goal is to achieve a balanced mix that sounds cohesive when all the elements are combined.
Ultimately, music is meant to be listened to in the context of a real-world playback environment, whether it's through speakers, headphones, or other playback systems. Regularly listening to your mix in context helps you assess how it will sound to listeners and make adjustments to optimize its performance across different playback systems.
Panning
Panning is a fundamental technique in audio engineering that involves distributing sound sources across the stereo field, ranging from the extreme left to the extreme right, to create a sense of space, width, and dimension in the mix. Here's a more detailed explanation of how panning works and its significance:
- Stereo Field: The stereo field refers to the spatial dimension of a stereo audio signal, where sounds can be positioned between the left and right speakers. Panning allows you to position individual sound sources within this stereo field to create a sense of directionality and spatial separation.
- Pan Potentiometers: In mixing consoles or digital audio workstations (DAWs), panning is typically controlled using pan potentiometers or pan knobs. These controls allow you to adjust the position of a sound source within the stereo field, ranging from hard left (100% left) to hard right (100% right), with center being the default position (0% left/right).
- Creating Space: By panning sound sources across the stereo field, you create a sense of space and width in the mix. Sounds panned to the left will predominantly be heard from the left speaker, while sounds panned to the right will predominantly be heard from the right speaker. This spatial separation helps prevent frequency masking and enhances clarity in the mix.
- Enhancing Depth: Panning is also used to enhance the perception of depth in the mix. Sounds panned closer to the center appear more upfront and prominent, while sounds panned towards the edges of the stereo field appear more distant and spacious. This depth perception adds realism and immersion to the mix, making it more engaging for the listener.
- Balancing Elements: Panning allows you to balance the distribution of sound sources within the stereo field to create a well-balanced mix. For example, you can pan instruments such as guitars, keyboards, and background vocals to different positions to ensure that they complement each other without competing for space in the mix.
- Creative Expression: Panning is a creative tool that can be used to shape the sonic character of a mix and express artistic intent. By experimenting with different panning positions and movements, you can create interesting stereo imagery, simulate the spatial characteristics of different environments, and add movement and dynamics to the mix.
Panning involves placing different sound sources within the stereo field to create a sense of space and width. Here are some panning techniques to consider:
Create a stereo image
Pan elements across the stereo spectrum to provide width and separation. Instruments with similar frequency ranges can be panned to different positions to avoid masking and improve clarity.
Consider the arrangement
Panning can help define the placement of instruments in the mix and highlight their importance. For example, guitars can be panned left and right to create a wide stereo image, while lead vocals are often centered for focus and clarity.
For example, we have this percussion where the first hit is panned to the extreme left and the second hit is panned to the extreme right. You need headphones or stereo speakers to perceive this sound.
Now let's take an example where we use panning to create space. Here we have these two pads playing some chords:
Let's hear these in the context of the full beat:
We then pan one pad to the right and the other to the left, and that leaves us with this sound:
Let's hear these in the context of the full beat:
Widening techniques
Utilize stereo widening tools, such as stereo enhancers or stereo imager plugins, to enhance the perceived width of certain elements. Be cautious not to overdo it, as excessive widening can lead to phase issues or an unnatural stereo image.
For example, boosting the side channel (also known as the stereo channel) with a mid-side EQ can indeed create a wider sound. Let me explain how this works:
- Mid-Side Processing: Mid-side processing involves separating the audio signal into two components: the mid channel (which contains the center-panned information) and the side channel (which contains the stereo information). This separation allows for independent processing of the mono and stereo components of the mix.
- Boosting the Side Channel: By boosting frequencies in the side channel using a mid-side EQ, you effectively emphasize the stereo information in those frequency ranges. This can create a perception of increased width and spaciousness in the mix, as the stereo elements become more prominent relative to the mono elements.
- Creating Width: Frequencies that are predominantly present in the side channel contribute to the perception of width in the mix because they are heard primarily in the stereo field. By boosting these frequencies selectively, you enhance the stereo content of the mix, making it sound wider and more expansive.
- Be Mindful of Balance: While boosting the side channel can create a wider sound, it's essential to maintain balance in the mix. Excessive boosting of the side channel, particularly in certain frequency ranges, can lead to an imbalance between the mono and stereo elements, resulting in a mix that sounds overly wide or lacking in focus.
- Use in Moderation: As with any processing technique, it's crucial to use boosting of the side channel with moderation and intentionality. Experiment with different frequency ranges and levels of boost to find the right balance that enhances the width of the mix without sacrificing clarity, focus, or cohesion.
Now for instance we have these staccato chords:
We then add slight boosts on the side channel to make the sound a bit wider using a mid-side equalizer:
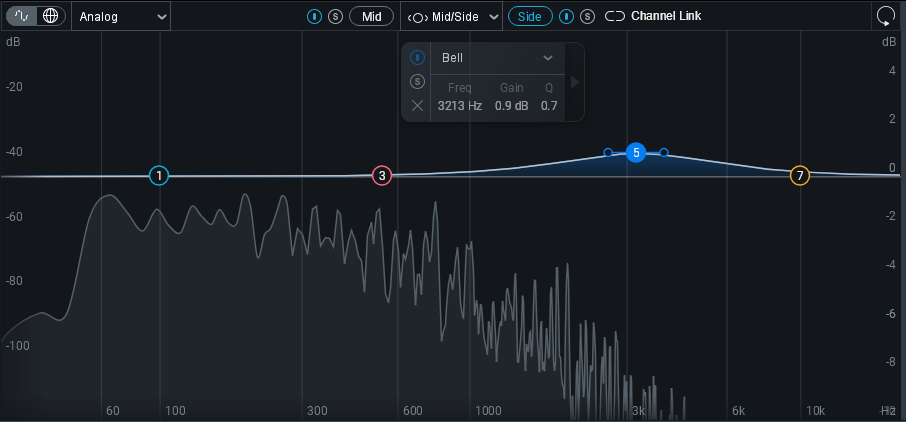
We then achieve a wider sound:
We also can widen up sounds using stereo imager tools.
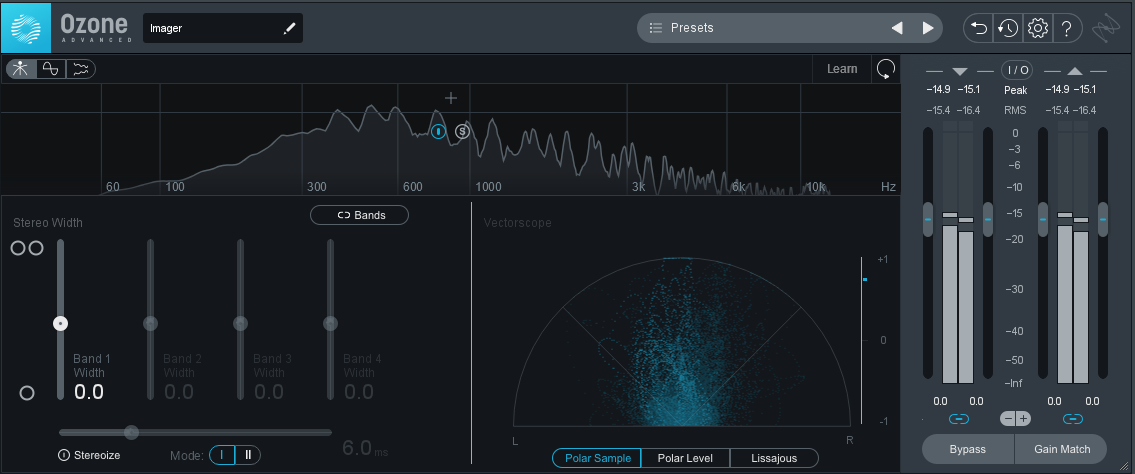
A stereo imager is a tool used in audio production to manipulate the stereo width of a sound or mix. It allows you to control the perceived spatial characteristics of the audio signal, making it sound wider or narrower. Here's how a stereo imager works and how it affects the sound:
- Frequency-Based Stereo Adjustment: A stereo imager typically operates by processing the audio signal across different frequency bands. This means that you can adjust the stereo width independently for different frequency ranges within the audio spectrum.
- Control over Stereo Width: Stereo imagers offer controls that allow you to adjust the stereo width of the audio signal. This can include parameters like width, spread, or stereo enhancement. Increasing the width parameter spreads the stereo image, making the sound appear wider, while decreasing it narrows the stereo field.
- Mid-Side Processing: Many stereo imagers utilize mid-side processing techniques. This means they separate the audio signal into its mid (center-panned) and side (stereo) components. By independently processing the mid and side signals, you have more control over the stereo width of the mix.
- Enhancing Depth and Dimension: By adjusting the stereo width of different frequency bands or elements within the mix, a stereo imager can enhance the depth and dimension of the audio. It allows you to create a sense of spaciousness and separation between elements, making the mix sound more immersive and dynamic.
- Creative Tool: Stereo imagers are commonly used as creative tools in mixing and mastering. They can be used to widen elements like synths, guitars, or vocals to create a more expansive soundstage. Conversely, they can also be used to narrow elements or tighten up the stereo image for a more focused and centered sound.
- Mix Translation: When used judiciously, stereo imagers can help optimize the mix for different playback systems. By adjusting the stereo width to suit the listening environment, you can ensure that the mix translates well across various playback devices, from headphones to stereo speakers to surround sound systems.
Here is an example of an imager tool:
Mid-Side processing
Mid-side processing is a powerful technique in audio engineering that involves separating the audio signal into its mid (center) and side (stereo) components, allowing you to adjust them independently. Here's a deeper dive into how mid-side processing works and why it's valuable:
- Separating Mid and Side Components: In mid-side processing, the audio signal is decoded into two components: the mid channel, which contains the audio information that is panned centrally in the stereo field (such as vocals, bass, and drums), and the side channel, which contains the audio information that is spread across the stereo field (such as stereo effects, ambiance, and spatial elements).
- Independent Processing: Once the audio signal is separated into mid and side components, you can process each component independently. This means you can apply different levels of EQ, compression, or other processing to the mid and side channels separately.
- Precision Stereo Imaging: By adjusting the level, EQ, or compression of the mid and side components independently, you gain precise control over the stereo image of the mix. For example, you can boost the high frequencies in the side channel to widen the stereo image or apply compression to the mid channel to bring forward the center-panned elements.
- Enhancing Clarity and Depth: Mid-side processing allows you to enhance the clarity, depth, and dimensionality of the mix. For instance, you can carve out space in the mid channel for vocals or lead instruments by attenuating frequencies in the side channel that may be masking them. This helps create a more focused and defined center image while still maintaining a spacious stereo field.
- Managing Dynamics: Mid-side compression is a common application of this technique, where compression is applied separately to the mid and side channels. This allows for more precise control over the dynamics of the mix, such as tightening up the center image with compression on the mid channel while retaining the dynamics and openness of the stereo elements in the side channel.
- Mixing with Intention: Mid-side processing empowers you to mix with intention and purpose, tailoring the stereo image to suit the aesthetic and sonic goals of the music. Whether you want a wide, expansive soundstage or a focused, centered mix, mid-side processing provides the tools to achieve your desired result with precision and finesse.
Now for instance we have these chords:
We than add slight boosts on the side channel:
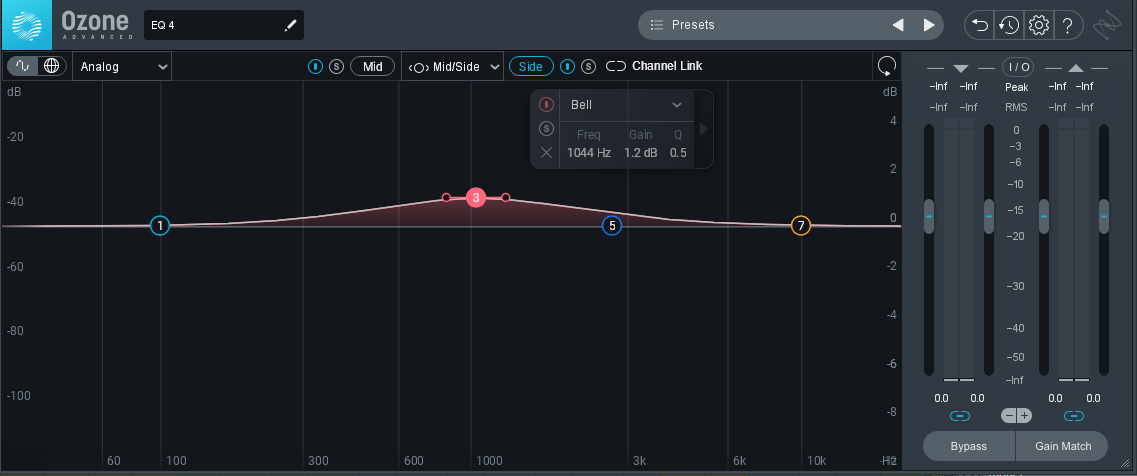
We then achieve chords with more clarity and depth:
Depth and dimension
Create depth in your mix by placing sound sources at different distances from the listener. Use reverb and delay effects to add spatial information and create a sense of depth, with elements closer to the front and those with longer decay times placed further back in the mix.
Creating depth in a mix involves manipulating the spatial characteristics of sound to simulate the perception of distance between the listener and the audio sources. Here's a deeper exploration of how to achieve depth in your mix by utilizing reverb and delay effects:
- Spatial Placement: Imagine a three-dimensional space in your mix, with the listener positioned in the center. By strategically placing sound sources within this virtual space, you can create a sense of depth. Sound sources positioned closer to the front of the mix will appear closer to the listener, while those placed further back will sound more distant.
- Reverb Effects: Reverb simulates the reflections of sound in a physical space, adding ambiance and spatial depth to the mix. Shorter reverb decay times are typically used to create a sense of proximity, while longer decay times evoke a feeling of distance. By applying reverb with varying decay times to different sound sources, you can place them at different distances within the mix.
- Delay Effects: Delay effects introduce repetitions of the audio signal with a slight delay, creating a sense of space and movement. Similar to reverb, shorter delay times can be used to create a sense of proximity, while longer delay times can suggest distance. By adjusting the delay time and feedback parameters, you can control the perceived depth of the delayed sound sources.
- Layering and Arrangement: The arrangement of sound sources within the mix also plays a crucial role in creating depth. Elements with longer decay times, such as pads or background vocals, are typically placed further back in the mix to create a sense of depth and spaciousness. Conversely, lead instruments or vocals are placed closer to the front to make them more prominent and immediate.
- Automation and Movement: Dynamic changes in the spatial placement of sound sources can further enhance the perception of depth in the mix. Experiment with automating parameters such as reverb decay time, delay feedback, and panning to create movement and variation within the mix. For example, you can automate the reverb decay time to increase during a breakdown section, creating a sense of expansion and depth.
- Critical Listening: As you manipulate reverb and delay effects to create depth, it's essential to listen critically and adjust parameters to achieve the desired spatial balance. Pay attention to how each element contributes to the overall depth of the mix and make adjustments as needed to maintain clarity and coherence.
By strategically using reverb and delay effects to place sound sources at different distances from the listener and creating a sense of depth, you can add dimensionality and realism to your mix, enhancing the overall listening experience.
Now for instance we have these plain chords with no reverb:
We than add some slight reverb which gives the chords more depth and dimension:
Now be careful not to add huge amounts of reverb to your instruments but to use reverb sparingly but creatively to add depth and dimension.
For instance we have these plain drums with no reverb:
We than add some slight delay which gives the drums more depth:
We can also add delay to add depth. For example we have plain tom drums with no delay:
We than add some slight delay and we get the sound:
Equalization (EQ)
EQ is a fundamental tool used in both mixing and mastering to shape the frequency content of individual tracks or the overall mix. Consider the following techniques when using EQ:
We will look at how to make space for the tracks in your mix making them shine more, clear and cleaner thus preventing clashing and frequency masking.
The concept of EQ (equalization) in making space within a mix involves using frequency adjustments to carve out sonic "space" for each element of the mix, allowing them to coexist without masking or clashing with one another. Here's a deeper dive into how EQ can be used to create space in a mix:
- Frequency Spectrum: Every sound in a mix occupies a certain range of frequencies within the frequency spectrum. EQ allows you to manipulate these frequency ranges to shape the tonal balance of individual elements and ensure that they fit together harmoniously in the mix.
- Frequency Masking: Frequency masking occurs when two or more sound sources occupy similar frequency ranges, making it difficult to distinguish them in the mix. This can lead to a muddy or cluttered sound. EQ can be used to reduce or eliminate frequency masking by attenuating overlapping frequencies in one or more sound sources, creating space for each element to be heard clearly.
- Identifying Clashes: When mixing multiple elements together, it's important to identify any frequency clashes or areas of overlap between different instruments or vocals. These clashes can occur in both the fundamental frequencies (the primary pitch of the sound) and the harmonic frequencies (the overtones and harmonics that give the sound its character). By using EQ to identify and address these clashes, you can create separation and clarity between elements, allowing them to stand out in the mix.
- Cutting and Boosting: EQ can be used to cut or attenuate frequencies in certain elements to make space for others, or to boost frequencies to enhance their presence or clarity. For example, you might cut the low frequencies in a guitar track to prevent it from masking the bass, or boost the high frequencies in a vocal track to make it stand out more clearly against a dense mix.
- Surgical vs. Broad EQ: EQ adjustments can be made with surgical precision or in broader strokes, depending on the specific needs of the mix. Surgical EQ involves making precise cuts or boosts at specific frequencies to address specific issues, while broad EQ involves more gentle shaping of the overall frequency balance. Both approaches can be effective in creating space within a mix, depending on the context.
- Contextual Listening: When using EQ to create space in a mix, it's important to listen in context and consider how each adjustment affects the overall balance and clarity of the mix. Pay attention to how each element interacts with the others and make adjustments accordingly to achieve a cohesive and well-balanced mix.
For example, we have some chords with some low end frequencies. Ideally, when mixing, we should eq out some of the low end frequencies of all the instruments that do not contribute to the low end of the song or beat. For example, we would want to take out some of the low end from melodic instruments which provide more frequency content in the mid frequencies and the high frequencies. This will ensure that the kick and bass elements of the mix are not clashing for space and the mix does not become muddy.
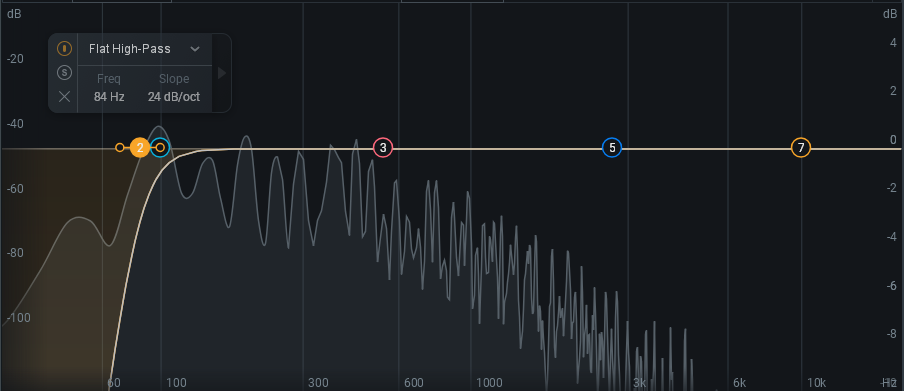
We than add an equalizer and cut some of the low end content of the chords and that leaves us with this sound:
Frequency carving
Use EQ to remove unwanted frequencies, such as rumble, background noise, or harsh frequencies that can detract from the clarity and balance of the mix.
Using EQ to remove unwanted frequencies is an essential part of the mixing process to clean up the audio and enhance the clarity and balance of the mix. Here's a more detailed explanation of how EQ can be used for this purpose:
- Identification of Unwanted Frequencies: Before applying EQ, it's crucial to identify the specific frequencies that you want to remove. These could include low-frequency rumble from microphone handling noise or room resonance, background noise such as hum or hiss, or harsh frequencies that contribute to an unpleasant or fatiguing sound.
- Frequency Spectrum Analysis: Many EQ plugins offer spectrum analyzers or visual representations of the frequency spectrum, which can help you identify unwanted frequencies more accurately. By observing the frequency spectrum of the audio signal, you can pinpoint problem areas and determine the frequencies that need to be attenuated or removed.
- Filter Types: EQ plugins typically offer different types of filters, such as high-pass, low-pass, band-pass, and notch filters, which can be used to target specific frequency ranges. High-pass filters are effective for removing low-frequency rumble, while low-pass filters can attenuate high-frequency noise. Band-pass filters are useful for targeting a specific frequency range, and notch filters can be used to surgically remove narrow bands of frequencies.
- Surgical Removal: For precise removal of unwanted frequencies, surgical EQ techniques involve making narrow cuts at specific frequencies to eliminate problem areas while minimizing the impact on the rest of the audio signal. This approach allows you to remove unwanted frequencies without significantly affecting the overall tonal balance of the mix.
- Broad Shaping: In some cases, broad EQ adjustments may be necessary to address broader areas of frequency buildup or resonance. For example, you might use a broad-bandwidth cut to tame harshness in the midrange or sculpt the tonal balance of a particular instrument or vocal.
- Listening and Adjustment: As with any mixing technique, it's important to listen critically while applying EQ adjustments and make adjustments based on how they affect the overall sound of the mix. Pay attention to how the removal of unwanted frequencies improves the clarity, balance, and intelligibility of the mix, and adjust the EQ settings as needed to achieve the desired result.
By applying surgical EQ techniques to the kick drum and bass, you can effectively address frequency masking issues and create a cohesive low end that provides both punch and clarity in the mix.
For instance we have a kick and bass:
We add this EQ on the bass, and cut out some unwanted high frequencies to leave space for melodic content and low frequencies below 30Hz to eliminate some low end mud. We also do a slight boost around 120Hz where the bass frequencies we want are more prominent.
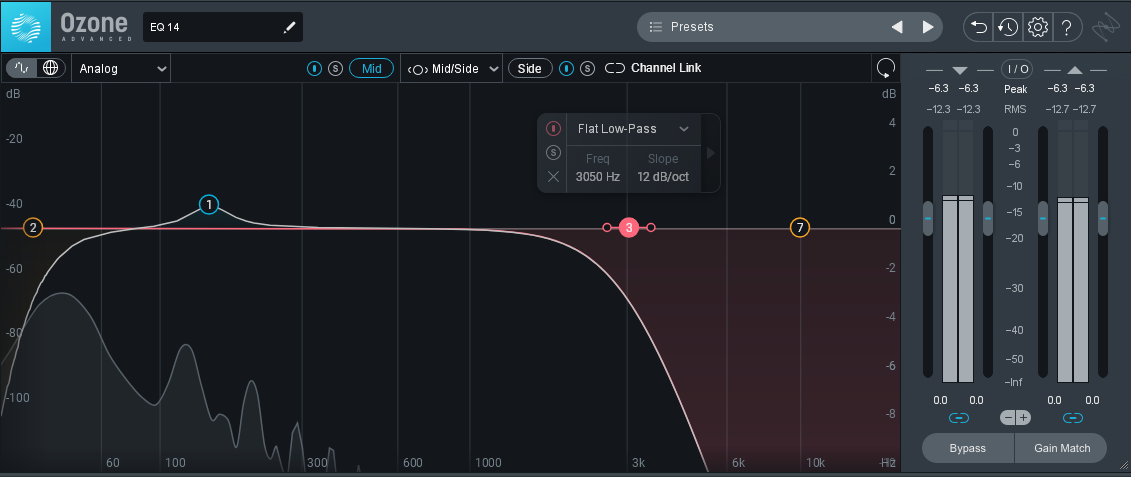
We then add an EQ on the kick to tame the heavy low end to prevent frequency masking with the low end frequencies of the bass and also attenuate some frequencies in the area where the bass frequencies are more prominent thus giving the bass more room and this resuts in a clean low end.
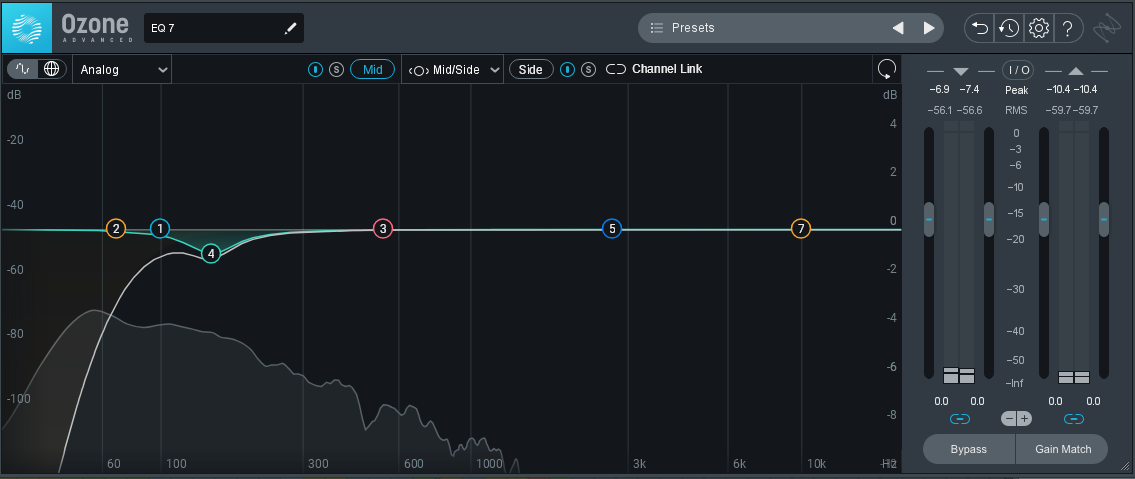
Here is another example where we use EQ to tame the muddy low end frequencies and the sharp high end frequency contents of the hi-hat drum.
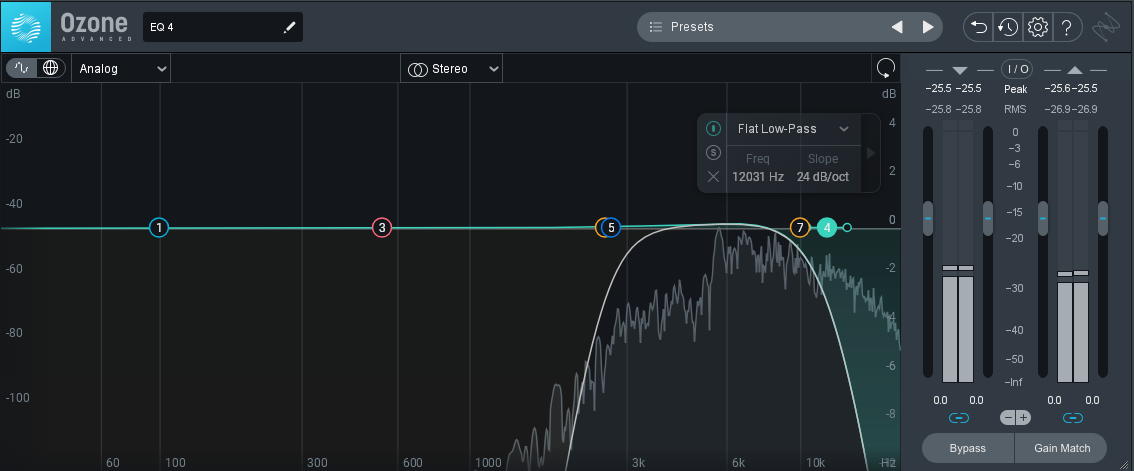
We then add an equalizer and cut some of the low end content of the chords, leaving us with this sound:
Use EQ to shape how your instruments sound. Cut out high frequencies, for example, frequencies beyond 16K that tend to be too sharp in order to achieve a clean high end mix.
For instance, we have a guitar melody:
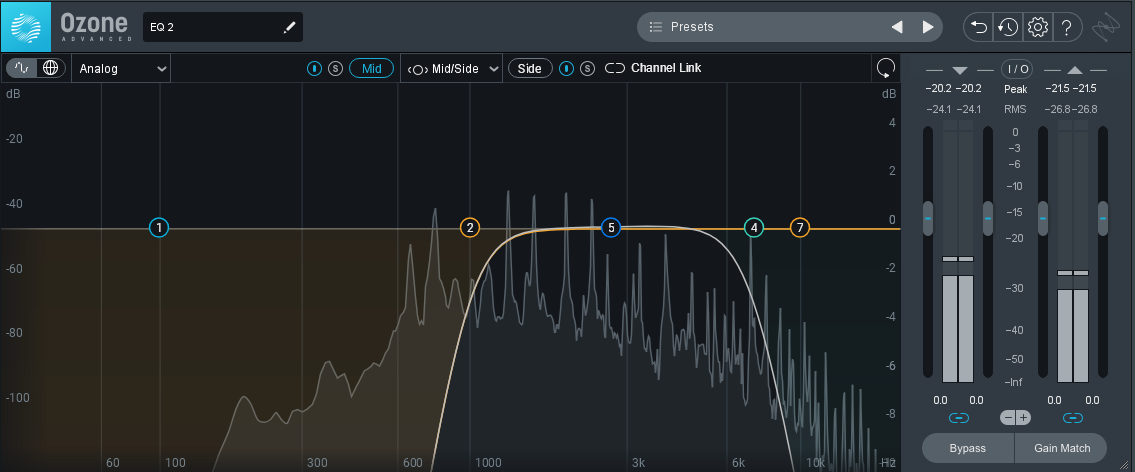
We use EQ to cut out the unwanted low end frequencies of the guitar as well as cutting out the sharp frequencies of the guitar.
Frequency balancing
Adjust the EQ of your individual tracks to ensure they sit well in the overall frequency spectrum. Address any frequency masking issues by reducing clashing frequencies or boosting frequencies that need emphasis.
Adjusting the EQ of individual tracks to ensure they sit well in the overall frequency spectrum is crucial for achieving a balanced and cohesive mix. Here's a more detailed explanation of how to approach this process effectively:
- Understanding Frequency Spectrum: The frequency spectrum refers to the range of audible frequencies, from low to high, that make up the audio signal. Different instruments and sound sources occupy specific frequency ranges within this spectrum, and their interaction determines the overall tonal balance of the mix.
- Selective Boosting and Cutting: Use EQ to selectively boost frequencies that add clarity, presence, or character to a particular instrument or sound source. Conversely, cut or attenuate frequencies that are unnecessary or problematic, such as low-end rumble, harsh frequencies, or resonant peaks.
- Iterative Process: EQ adjustment is often an iterative process, requiring experimentation and refinement over time. Don't be afraid to revisit EQ settings as you progress through the mix, making adjustments as needed to achieve the desired tonal balance and clarity.
For instance, we have a pad:
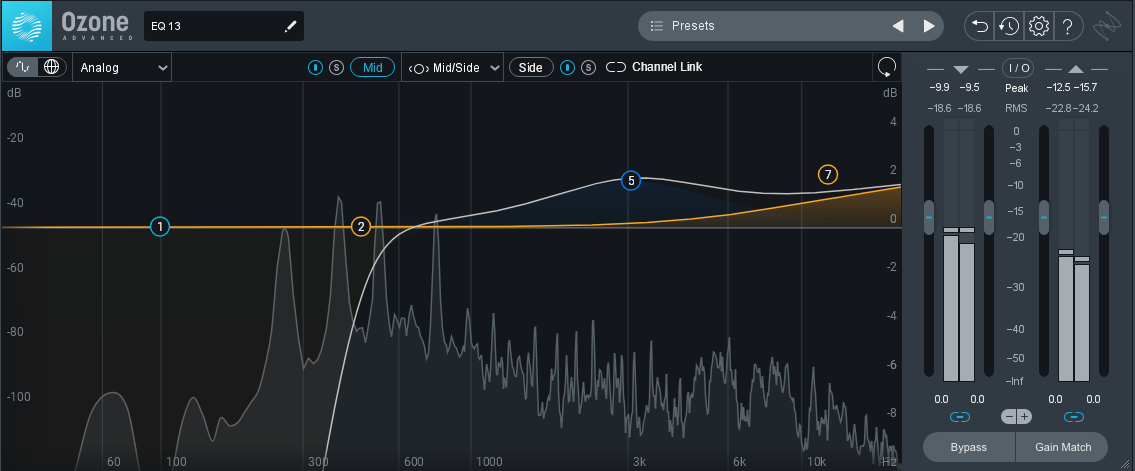
We use EQ to cut out the unwanted low end frequencies of the pad as well as boosting the high end frequency content to give the pad more presence.
We can also use surgical EQ, for example, on the kick and bass to clean a muddy low end and achieve clarity. Surgical EQ involves precise adjustments to specific frequencies to address issues or enhance certain aspects of the audio. In the context of a kick drum and bass, surgical EQ might involve:
- Identifying Issues: Determine if the kick drum and bass are clashing in certain frequency ranges, such as the low end.
- Targeted Cuts: Use narrow-bandwidth EQ cuts to attenuate frequencies in the kick drum that overlap with the bass, such as the low-midrange frequencies where they might clash.
- Enhancing Clarity: Boost frequencies in the kick drum that provide punch and definition, such as the fundamental frequencies in the sub-bass range or the attack of the beater in the midrange.
- Frequency Balancing: Adjust the EQ of both the kick drum and bass guitar to create a balanced frequency spectrum, ensuring that each instrument occupies its own space without masking or overpowering the other.
- Critical Listening: Continuously listen to the mix to evaluate the impact of the EQ adjustments and make fine-tuning adjustments as needed to achieve a clear and well-balanced low end.
Mid-Side EQ
We can use mid-side EQ to achieve a cleaner mix.
For example, cutting the side frequencies of the kick helps to create a cleaner mix by reducing potential phase issues and stereo clutter. Here's how it works:
- Focus on Mono Information: Kick drum instruments typically contain essential low-frequency content that provides the foundation of the mix. By cutting the side frequencies, you prioritize the mono (center) information, ensuring that the low end remains focused and solid.
- Minimize Phase Interference: Low-frequency content in stereo can sometimes cause phase cancellation issues when summed to mono, resulting in a loss of power and clarity. By cutting the side frequencies of the kick and bass, you minimize the potential for phase interference, ensuring that the low end translates well across different playback systems.
- Reduce Stereo Clutter: Side frequencies in the low end of the mix can contribute to stereo clutter, making the mix sound less defined and cohesive. Cutting these frequencies helps to clean up the stereo field, allowing other elements of the mix to stand out more clearly and improving overall clarity and separation.
For example, we can add a Mid-Side EQ on the kick to cut the stereo frequencies on the side channel of the kicks, which are the elements that should provide the low end content. We do this in order to make space for the instruments that should provide the stereo content, such as the melodic instruments. For bass sounds, it may not be necessary to cut all the side frequencies but just cut the frequencies on the extreme low end while letting through the higher frequencies on wider bass sounds. However, the bass elements should not be too wide but should have a mono low end foundation.
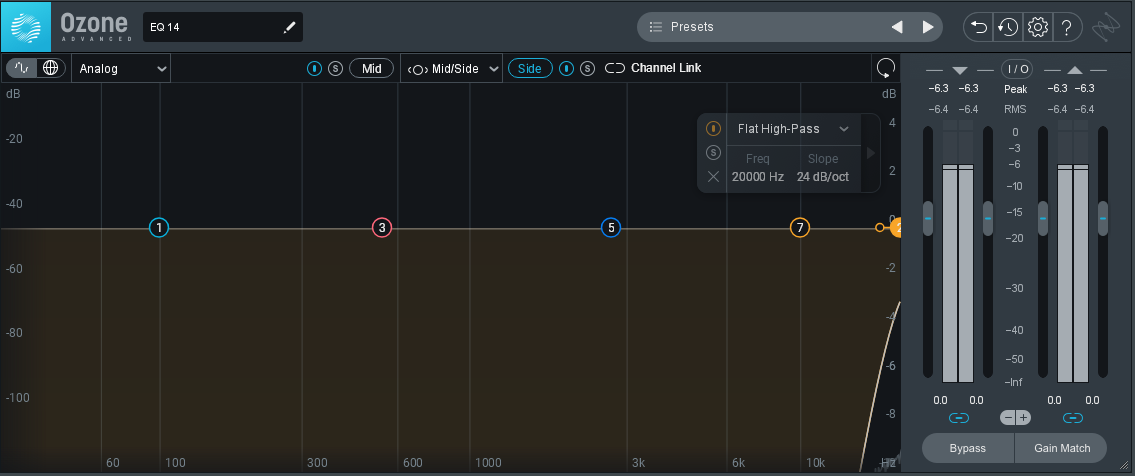
In summary, cutting the side frequencies of the kick and bass focuses the low end, minimizes phase issues, and reduces stereo clutter, contributing to a cleaner and more balanced mix.
Compression
Compression is a powerful tool used to control dynamics, balance levels, and shape the sound of individual tracks or the entire mix. Here are some compression techniques:
Below, we have an example of a compressor:

Compression is a fundamental tool in audio production used to control the dynamic range of audio signals. Here's a detailed explanation of how compression works and its various applications:
- Dynamic Range Control: Compression reduces the dynamic range of an audio signal by attenuating the level of louder passages while leaving quieter passages relatively unaffected. This helps to even out the overall volume and make the audio signal more consistent in level.
- Threshold and Ratio: Compression is typically applied using parameters such as threshold and ratio. The threshold sets the level at which compression begins to take effect, while the ratio determines the amount of attenuation applied to signals above the threshold. For example, a ratio of 4:1 means that for every 4 dB the input signal exceeds the threshold, the output signal will only increase by 1 dB.
- Attack and Release: Compression also includes parameters such as attack and release. The attack time specifies how quickly the compressor responds to signals that exceed the threshold, while the release time determines how quickly the compressor returns to its inactive state once the signal falls below the threshold. These parameters affect the transient response and character of the compression effect.
- Applications in Mixing: In mixing, compression is used to control the dynamics of individual tracks or the entire mix. For example, compressors can be used to tame the peaks of vocal recordings, smooth out the dynamics of bass guitars, or add punch and energy to drum tracks. Compression can also be used on submixes or the master bus to glue the mix together and achieve a more cohesive sound.
- Enhancing Punch and Presence: Compression can be used creatively to enhance the punch and presence of audio signals. By using fast attack times and moderate ratios, compressors can emphasize the initial transients of percussive sounds, such as drums or plucked instruments, making them sound more impactful and upfront in the mix.
- Balancing Levels: Compression is also effective for balancing the levels of different tracks within a mix. By reducing the dynamic range of individual tracks, compressors can bring quieter elements forward in the mix while controlling the peaks of louder elements, resulting in a more balanced and cohesive overall sound.
- Limiting: Compression can also be used as a form of limiting to prevent signals from exceeding a certain level. This is commonly applied to prevent clipping in digital audio systems or to add a sense of control and consistency to the mix.
Let's see a practical example. We have this drum pattern that is not compressed.
We can add a compressor to control the dynamics of this drum pattern as shown in the visual compressor.
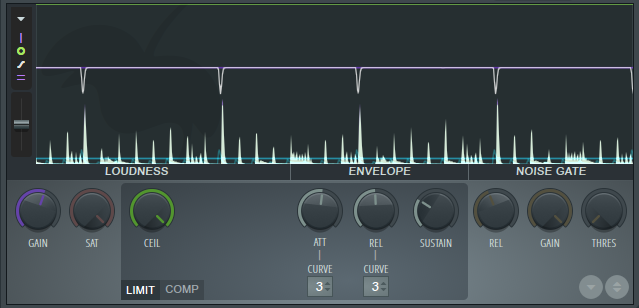
The compression controls the dynamics and gives the drums a more stronger punch.
In conclusion, compression is a versatile tool used in audio production to control dynamics, balance levels, and shape the sound of individual tracks or the entire mix. By understanding how compression works and how to apply it effectively, audio engineers can achieve greater control and creativity in their mixes.
Automation
Automation involves adjusting various parameters over time to add movement, variation, and emphasis to your mix. Consider the following automation techniques:
Volume automation
Automate the volume levels of individual tracks or specific sections to create dynamic changes and add emphasis to certain elements.
Pan automation
Automate panning positions to create movement and interest within the stereo field. This technique can be particularly effective for elements like synths, pads, or background vocals.
Effects automation
Automate parameters of effects such as reverb, delay, or filter cutoff to introduce transitions, create spatial movement, or add excitement to the mix.
Use automation to create movement and interest in your mix. Experiment with automating the panning of certain elements to create a dynamic and evolving soundscape.
For example we have this ride that is panned more to the left and the panning is automated to the right throughout the playing of the pattern.
So now we have a rough mix and we can proceed to mastering. We then export the mixed track. The recommended format for exporting is WAV to maintain audio quality, with a commonly recommended bit depth of 24-bit.
Here is how the mix sounds so far:
Introduction to Mastering
Mastering is the final stage in the music production process, where the mix is further refined and prepared for distribution. While mastering is a complex and specialized skill, here are some techniques commonly used:
EQ and compression
Apply subtle EQ and compression adjustments to enhance the overall tonal balance and control dynamics.
In the context of mastering, applying subtle EQ and compression adjustments is a crucial step to enhance the overall tonal balance, control dynamics, and ensure the cohesiveness of the final mix. Here's a more detailed explanation of how these processes work in mastering:
Subtle EQ Adjustments:
- Tonal Balance: Mastering engineers often use EQ to subtly adjust the tonal balance of the mix, ensuring that all frequencies are represented accurately and that there are no excessive peaks or dips in the frequency spectrum. This may involve boosting or cutting specific frequency ranges to correct any perceived tonal imbalances.
- Enhancing Clarity: Subtle EQ adjustments can also be used to enhance clarity and definition in the mix. For example, gentle boosts in the high-frequency range can add air and sparkle to the mix, while slight cuts in the low-midrange can reduce muddiness and improve transparency.
- Corrective EQ: In some cases, mastering engineers may use EQ to address specific issues identified during the mastering process, such as resonant peaks, harsh frequencies, or excessive sibilance. These corrective EQ adjustments are typically applied with precision to target problem areas without affecting the overall tonal balance of the mix.
Subtle Compression Adjustments:
- Dynamic Control: Compression in mastering is used to control the dynamic range of the mix, ensuring that the levels are consistent and that no individual elements overpower the rest of the mix. Subtle compression adjustments help to tame transient peaks and smooth out the overall dynamics without introducing audible pumping or artifacts.
- Glue and Cohesion: Compression can also be used to add a sense of glue and cohesion to the mix, bringing together the individual elements and making them sound more cohesive as a whole. By gently compressing the mix, mastering engineers can create a more polished and professional-sounding final product.
- Increasing Loudness: In addition to controlling dynamics, compression in mastering is often used to increase the perceived loudness of the mix. By applying gentle compression to the mix, mastering engineers can bring up the overall level of the mix, making it sound louder and more competitive in a commercial context.
Subtlety and Transparency:
- Transparent Processing: Subtle EQ and compression adjustments in mastering are typically applied with transparency in mind, meaning that the processing should not be overly noticeable or distracting to the listener. The goal is to enhance the mix in a way that is natural and transparent, preserving the integrity of the original sound while improving its overall quality.
- Preserving Dynamics: It's important to strike a balance between controlling dynamics and preserving the natural dynamics of the mix. Subtle compression adjustments should maintain the dynamics and musicality of the mix, allowing it to breathe and retain its emotive impact.
Listening and Iteration:
- Critical Listening: Throughout the mastering process, mastering engineers listen critically to the mix, evaluating the impact of each EQ and compression adjustment on the overall sound. This iterative approach allows them to make subtle refinements until the mix sounds polished and balanced across different playback systems.
- Reference Tracks: Mastering engineers may also compare the mix to reference tracks in a similar genre or style to ensure that the tonal balance, dynamics, and overall sound quality meet industry standards and client expectations.
Mastering is the final stage in the music production process, where the mix is further refined and prepared for distribution. While mastering is a complex and specialized skill, here are some techniques commonly used:
So let's start mastering the audio we exported. First we route the mixed beat to the master.
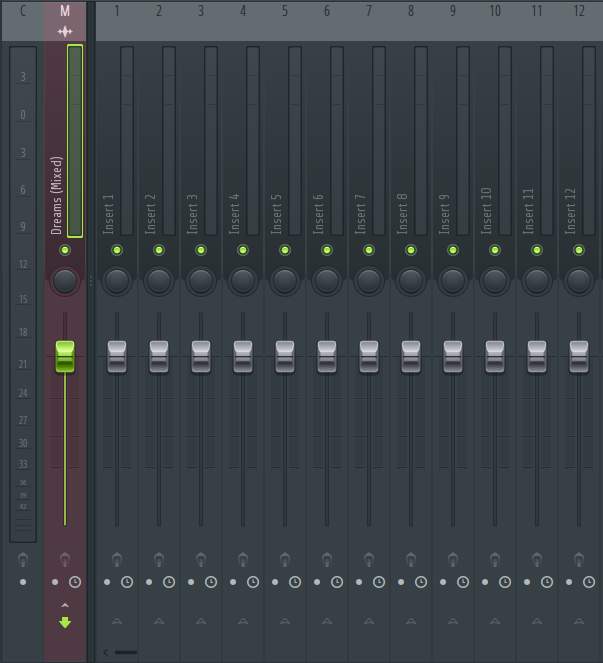
For instance we have the hook that's not mixed sounding like this:
We then add an EQ on the mid side of the master:
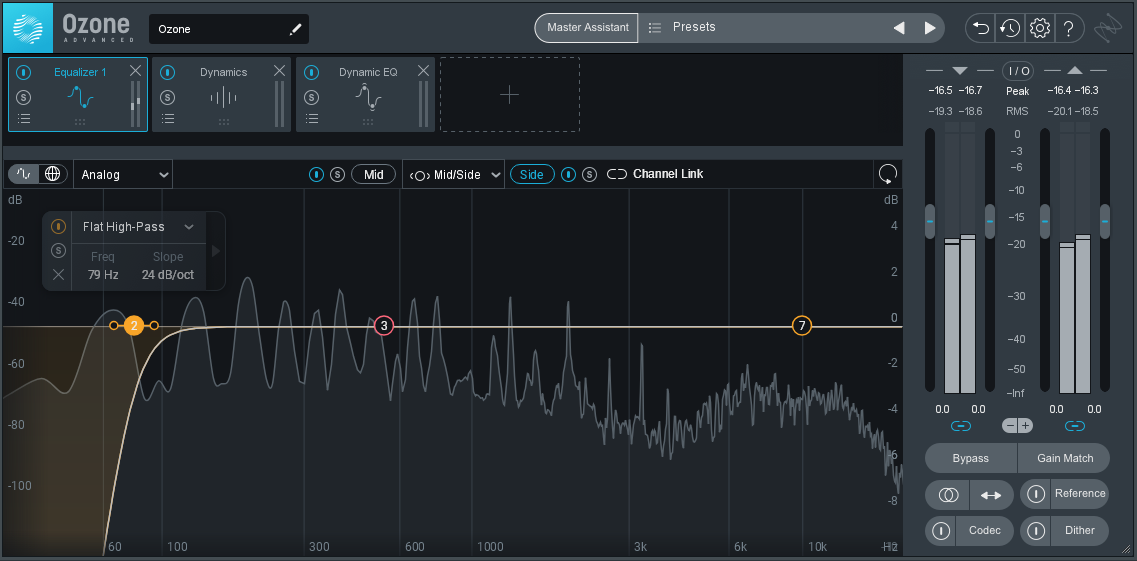
And this one on the side channel to clean up the low end.
And we get this result:
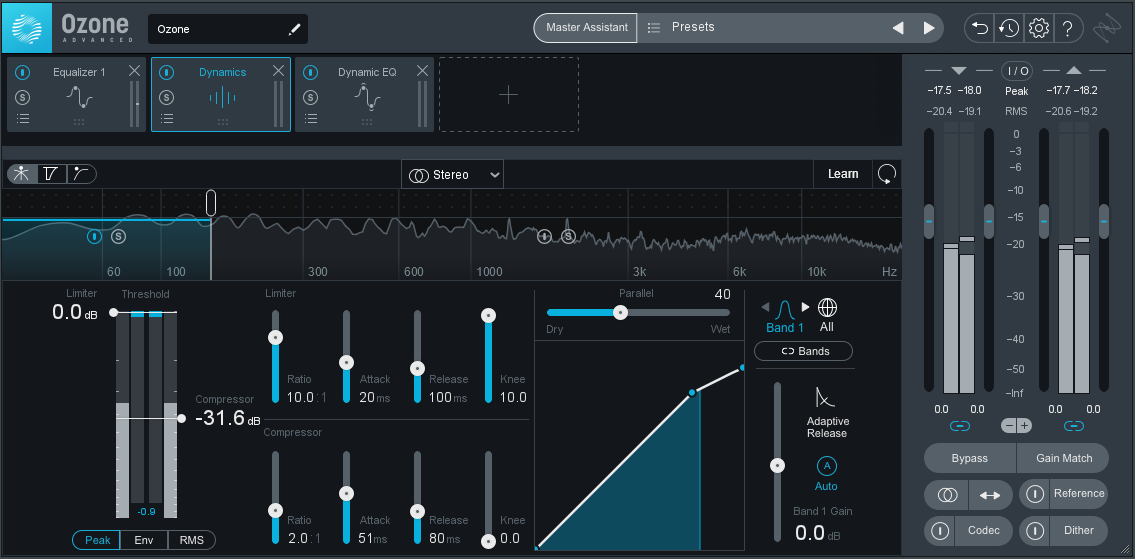
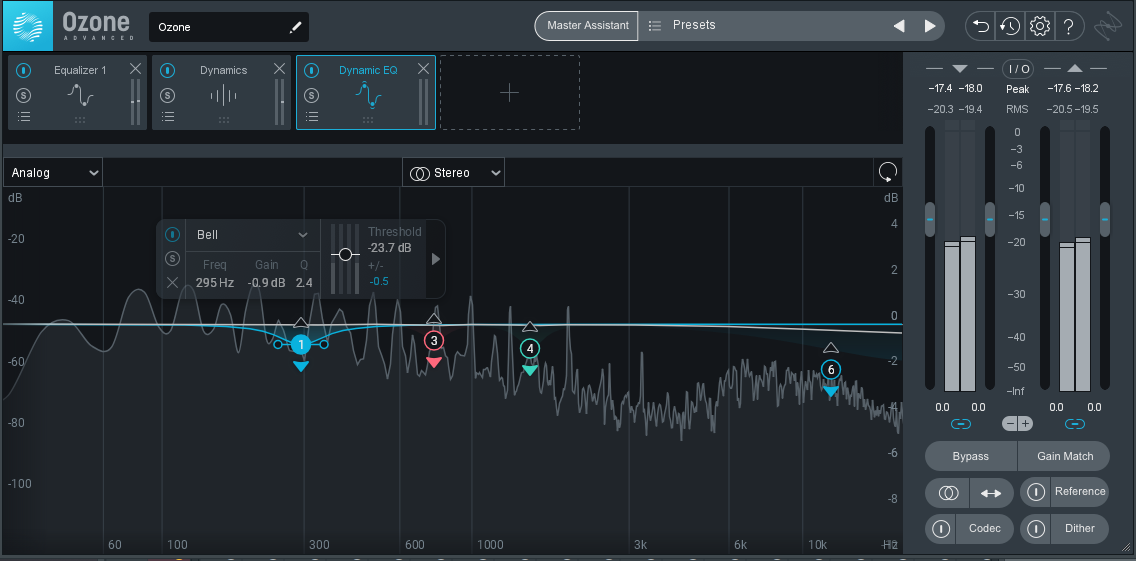
After EQ, we then tame the dynamics by using a Compressor and a Dynamic EQ. For example we have the multi-band compressor taming the low end frequencies as below:
And we have the Dynamic EQ as below the high end frequencies:
We achieve this result:
After taming the dynamics, we would like to add compression to glue the mix together:
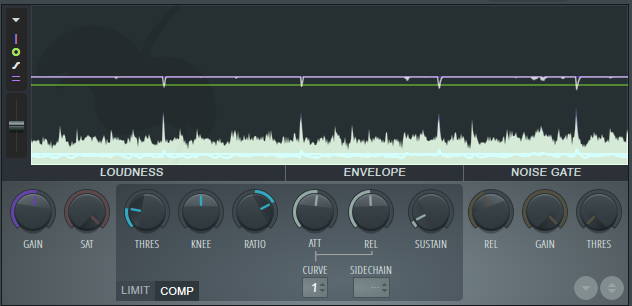
The result is a more cohesive and louder mix:
Saturation
Using saturation in mastering can add warmth, character, and depth to your final mix. Saturation plugins or hardware emulate the analog warmth and distortion characteristics of vintage audio equipment, such as tape machines, tube amplifiers, or analog consoles. Here's how you can effectively use saturation in mastering:
- Choose the Right Saturation Plugin: There are many saturation plugins available, each with its own unique sound characteristics. Experiment with different plugins to find one that complements your mix. Some popular saturation plugins include FabFilter Saturn, Waves Kramer Master Tape, and Soundtoys Decapitator.
- Use Saturation Sparingly: Saturation should enhance your mix, not overpower it. Apply saturation subtly and in moderation. Start with a low saturation level and gradually increase it until you achieve the desired effect.
- Apply Saturation to Individual Tracks: Before applying saturation to the master bus, consider whether certain individual tracks or groups could benefit from saturation. For example, you might want to add saturation to the drums to give them more punch and presence, or to the vocals to add warmth and texture.
- Experiment with Different Saturation Types: Saturation plugins often offer different types of saturation, such as tape saturation, tube saturation, or transistor saturation. Each type imparts a different color and character to the sound. Experiment with different saturation types to find the one that best suits your mix.
- Adjust the Saturation Parameters: Saturation plugins typically offer various parameters that allow you to fine-tune the saturation effect. These parameters may include drive, saturation level, tone, and mix blend. Adjust these parameters to tailor the saturation effect to your liking.
- Use Saturation to Glue the Mix Together: Saturation can help glue the individual elements of your mix together, creating a more cohesive and unified sound. Apply saturation subtly across the entire mix to add warmth and cohesion.
- Be Mindful of Clipping: Saturation adds harmonic content to the audio signal, which can increase the overall level of your mix. Be mindful of clipping and adjust the input gain or output level of the saturation plugin to prevent clipping and maintain a healthy signal level.
- Compare Before and After: Always compare the sound of your mix before and after applying saturation. A/B comparisons can help you assess the impact of saturation on your mix and make informed decisions about its use.
- Trust Your Ears: Ultimately, mastering is a creative process, and there are no strict rules for using saturation. Trust your ears and use saturation in a way that enhances the overall sound of your mix.
By following these guidelines and experimenting with saturation in your mastering process, you can add warmth, depth, and character to your final mix while preserving the integrity of the original audio.
For instance we use multi-band tape saturation to add warmth and character in the mids around 549Hz-2000Hz.
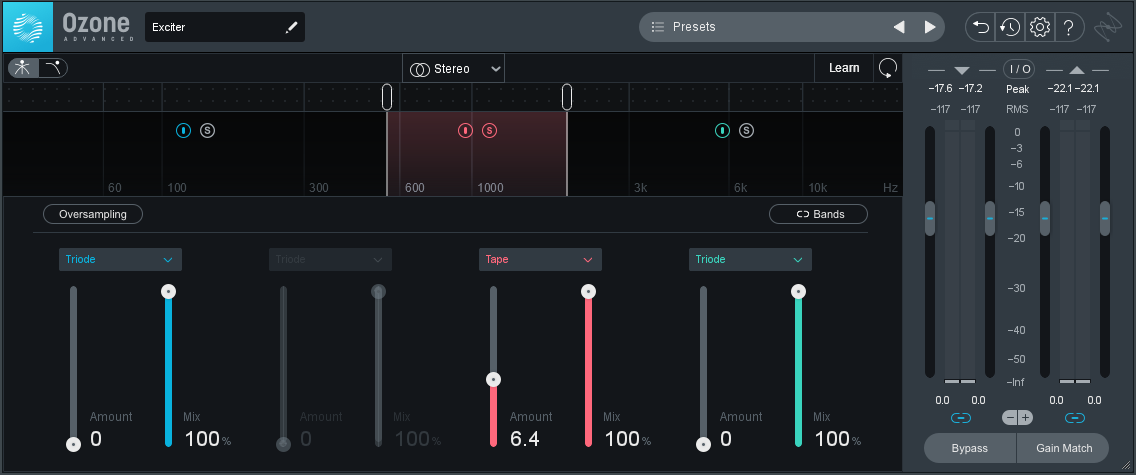
Here is the mix with the band played in solo and no saturation applied:
Here is the mix with the band played in solo and saturation applied:
Here is the mix with and no saturation applied:
Here is the mix with saturation applied:
This is how the multi-band saturation would look like:
Stereo enhancement
Fine-tune the stereo image to ensure the mix translates well across different playback systems while maintaining a sense of width and depth.
In the context of mastering, fine-tuning the stereo image refers to the process of adjusting the placement and width of audio elements within the stereo field to ensure that the mix sounds balanced, coherent, and immersive across different playback systems. This involves manipulating the stereo width, panning, and spatial characteristics of individual tracks or groups of tracks to create a sense of space, width, and depth in the mix.
Here's how you can approach fine-tuning the stereo image in mastering:
- Balancing Mono Compatibility: While it's essential to create a wide and spacious stereo image, it's equally important to ensure that the mix translates well to mono playback systems. Check the mix's mono compatibility by summing the left and right channels to mono and listening for any phase cancellation or loss of clarity. Make adjustments as needed to maintain clarity and balance in mono.
- Adjusting Panning: Review the panning positions of individual tracks or groups of tracks within the mix. Consider the role of each instrument or element and its placement within the stereo field. Pan instruments that occupy similar frequency ranges away from each other to create separation and clarity. Experiment with different panning positions to find the optimal balance and spatial placement for each element.
- Using Stereo Imaging Tools: Utilize stereo imaging plugins or tools to manipulate the stereo width of specific frequencies or the entire mix. These tools allow you to widen or narrow the stereo image, adjust the stereo field's focus, and enhance spatial characteristics. Exercise caution when using stereo widening effects to avoid phase issues or an unnatural sound.
- Utilizing Mid-Side Processing: Implement mid-side processing techniques to fine-tune the stereo image's balance and width. Mid-side processing separates the audio signal into its mid (mono) and side (stereo) components, allowing you to independently manipulate the center and stereo information. Adjust the balance between the mid and side signals to control the perceived width while maintaining a solid center image.
- Referencing on Different Playback Systems: Listen to the mastered mix on a variety of playback systems, including studio monitors, headphones, car stereos, and consumer-grade speakers. Pay attention to how the mix translates across different environments and make adjustments as necessary to ensure consistency and coherence.
- Maintaining Dynamic Range and Clarity: While fine-tuning the stereo image, it's crucial to preserve the mix's dynamic range and clarity. Avoid excessive stereo widening or processing that can compromise the mix's punch, focus, and definition. Strike a balance between creating a spacious stereo image and maintaining the mix's clarity and impact.
For instance, the mix was sounding like this initially:
We than use an imager to optimize the stereo field for mono compactibility by making the low end frequency content centered that is in mono.
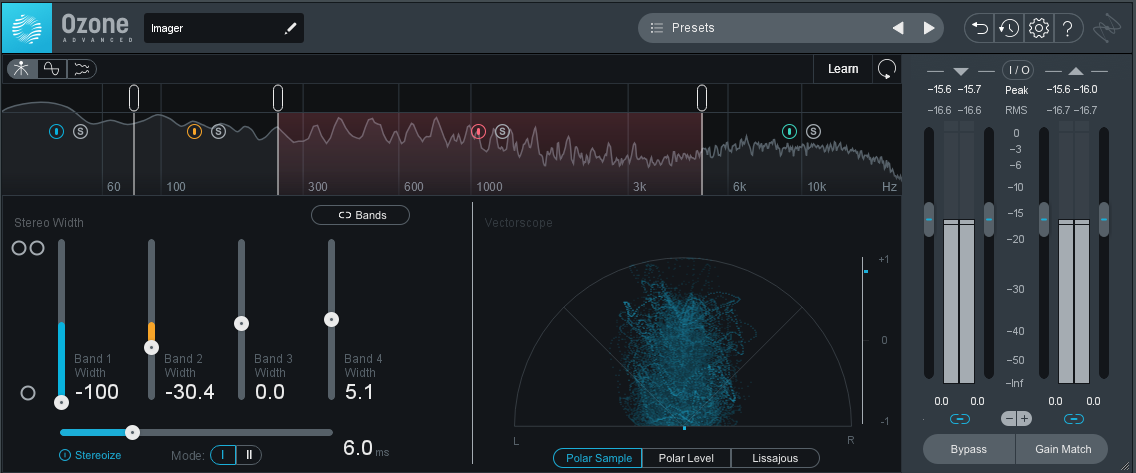
With the stereo imaging processing applied, we get this result:
We also use Mid-Side processing, where by we cut frequencies of the side channel essentially on the low end frequencies:

Loudness optimization
Utilize techniques such as multi-band compression or limiting to achieve an appropriate overall loudness level for the intended genre and target platform.
In mastering, achieving an appropriate overall loudness level is crucial for ensuring that the final mix meets the expectations of the intended genre and target platform while maintaining clarity, dynamics, and impact. Utilizing techniques such as multi-band compression or limiting can help you achieve this goal effectively. Here's a more detailed explanation of how these techniques work:
Multi-Band Compression:
Multi-band compression divides the audio signal into multiple frequency bands, each of which can be compressed independently. This allows you to control the dynamics of different frequency ranges separately, addressing specific issues and enhancing overall balance and consistency.
Identify frequency bands that may require dynamic control, such as low-end frequencies for bass, mid-range frequencies for vocals and instruments, and high-end frequencies for cymbals and brightness. Apply compression to each band with settings tailored to the characteristics of the audio material and the desired level of control.
Multi-band compression enables you to shape the dynamic range of the mix more precisely, addressing imbalances and enhancing clarity without affecting other frequency ranges unnecessarily. It allows for greater control over the overall tonal balance and ensures that each frequency band contributes effectively to the mix's perceived loudness and impact.
For example we use a multi-band compressor to compress only the low end frequencies as below:

Limiting:
Limiting is a dynamic processing technique that prevents audio signals from exceeding a specified threshold level, effectively limiting the peak amplitude of the signal. This helps to increase overall loudness while avoiding clipping and distortion.
Set the threshold of the limiter to a level that allows for sufficient dynamic range while preventing peaks from exceeding the desired maximum level. Adjust the release time to achieve a balance between controlling peaks and maintaining natural dynamics. Use makeup gain to boost the overall level of the mix to the desired target loudness.
Limiting helps to increase the overall loudness of the mix while preserving its dynamic range and transient detail. It ensures that the mix achieves a competitive volume level without sacrificing clarity, punch, or sonic integrity. Limiting is particularly effective for genres that demand high levels of loudness.
For example we use a limiter to increase the overall loudness of the mix:
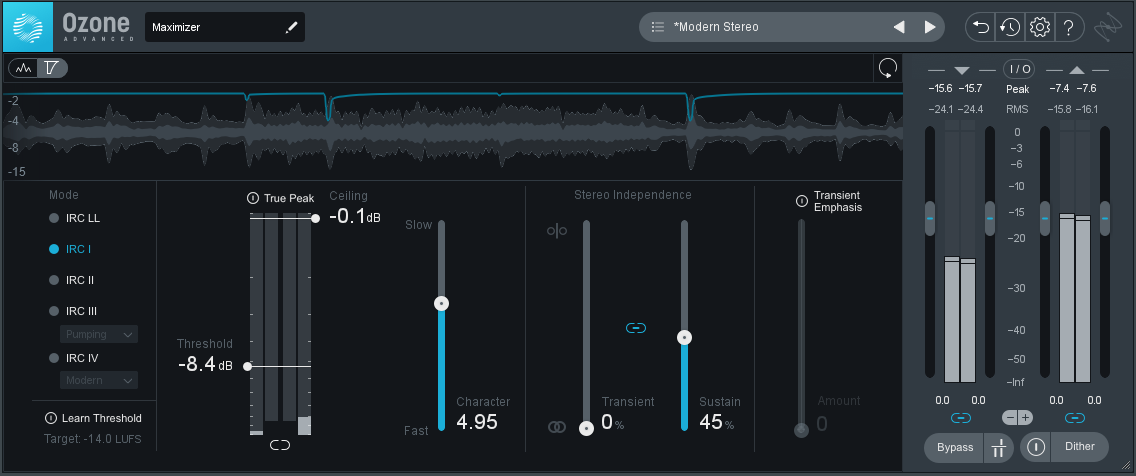
For example, initially we had the following audio:
With the limiter, the mix becomes louder:
Congratulations! Now with the loudness optimization and few tweaks, we now have a mastered audio:
